| Tip |
| To display a JPG or PNG image in a program, you can insert an Image control in the GUI using Wintempla. It is necessary to specify the filename of the image in the program. The full path of the image can be used or the file can be placed in the program folder. If the image file is placed in the program folder, it is not necessary to specify the full path, for instance, if the program is located in C:\Documents\, then the image file must be located in C:\Documents\Program\Programa\imagen.jpg. Para mostrar una imagen del tipo JPG o PNG en un programa, se puede insertar el control de Image en la GUI usando Wintempla. En el programa es necesario especificar el nombre del archivo de la imagen. Se puede proporcionar la ruta completa del archivo o bien se coloca el archivo de imagen en la misma carpeta del programa. Si el archivo de la imagen es ubicado en la carpeta del programa, no es necesario especificar la ruta completa, por ejemplo, si el programa está ubicado en C:\Documents\, entonces el archivo de la imagen se debe colocar en C:\Documents\Program\Programa\imagen.jpg. |
| Problem 1 |
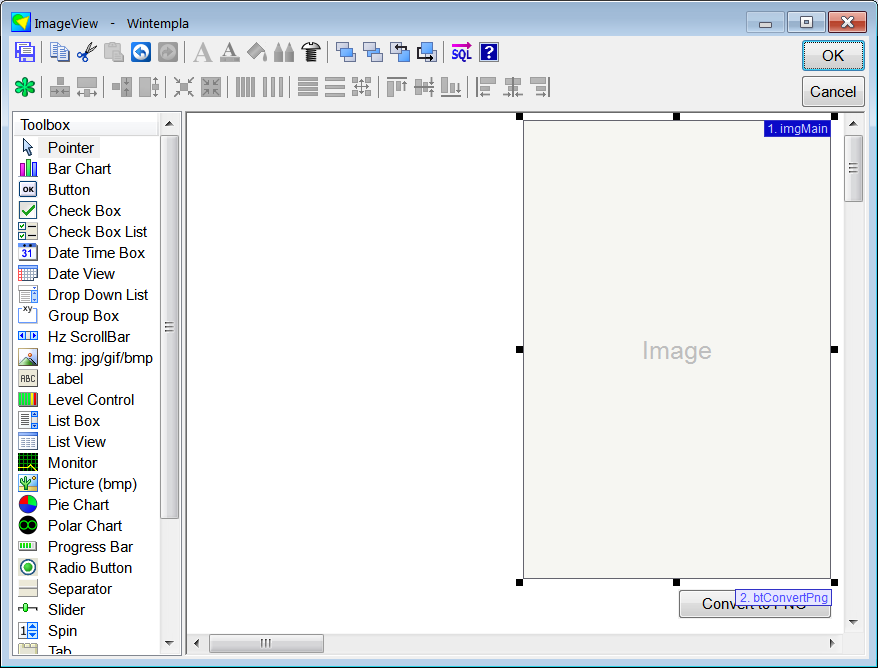
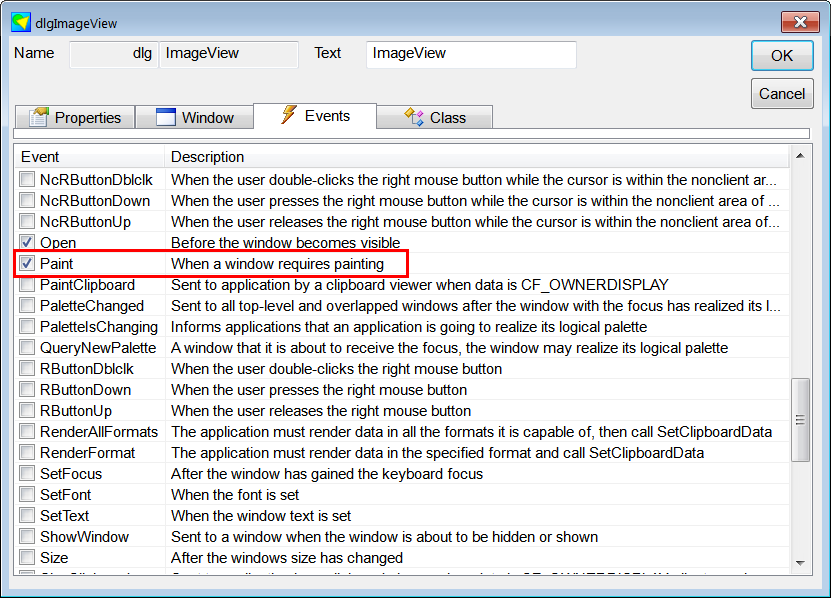
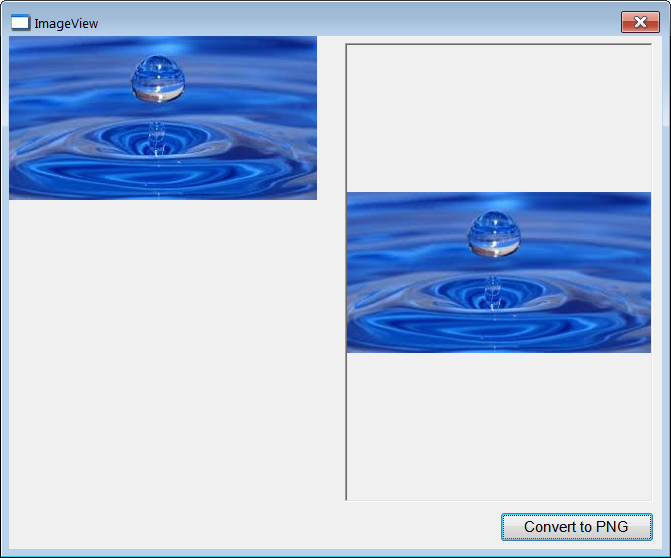
| Create a program called ImageView to display a JPG (or PNG) image. The program will show two different methods to display the image. Insert an Image control and select the Paint event as shown. Insert also a button to show how to export the JPG image to PNG. Cree un programa llamado ImageView para mostrar una imagen JPG (o PNG). El programa mostrará dos métodos diferentes para mostrar la imagen. Inserte un Image control y seleccione el evento Paint como se muestra. Inserte un botón también para mostrar cómo se puede exporta una imagen JGP a PNG. |
| ImageView.cpp |
| ... void ImageView::Window_Open(Win::Event& e) { //________________________________________________________ imgMain imgMain.FileName = L"C:\\Users\\Jhon\\Picture.jpg"; } void ImageView::btConvertPng_Click(Win::Event& e) { Win::FileDlg dlg; dlg.Clear(); dlg.SetFilter(L"PNG image files (*.png)\0*.png\0\0", 0, L"png"); if (dlg.BeginDialog(hWnd, L"Save", true) == TRUE) { Sys::Convert::Image(imgMain.FileName.c_str(), dlg.GetFileNameFullPath(), 0); } } void ImageView::Window_Paint(Win::Event& e) { // THE LAST PARAMETER must be "true" to turn on GDI+ CG::Gdi gdi(hWnd, true, true); Gdiplus::Image image(L"C:\\Users\\Jhon\\Picture.jpg"); gdi.Plus.DrawImage(&image, 0, 0); } |
JPEG encoding |
The JPEG format is explained in https://parametric.press/issue-01/unraveling-the-jpeg/. The three layers of JPEG encoding are:
El formato JPEG se explica en https://parametric.press/issue-01/unraveling-the-jpeg/. Las tres capas de codificación de JPG son:
|
JPEG decoding |
|
Run-length encoding |
| It is a lossless data compression. This encoding method works best when the data contains sequences of the same value. The coding consists of indicating how many times a value is repeated, follow of the value. For instance, the sequence AAABZZZZZEE can be compressed as 3A 1B 5Z 2D. Este es un método de compresión de datos. Este método de codificación trabaja mejor cuando los datos tiene secuencias del mismo valor. El código consiste en indicar cuantas veces el valor se repite, seguido del valor. Por ejemplo, la secuencia AAABZZZZZEE se puede comprimir cómo 3A 1B 5Z 2D. |
Delta encoding |
| It is a data encoding also known as data differencing. The coding consists of compute the difference between two consecutive values. For instance, the sequence 5, 6, 8, 9, 4 is encoded as 5, 1, 2, 1, -5. See the class Sys::DeltaCoder. Es un método de codificación también conocido como diferencias de datos. La codificación consiste en calcular la diferencia entres dos valores consecutivos. Por ejemplo, la secuencia 5, 6, 8, 9, 4 se codifica cómo 5, 1, 2, 1, -5. Vea la clase Sys::DeltaCoder. |
Independent JPEG Group |
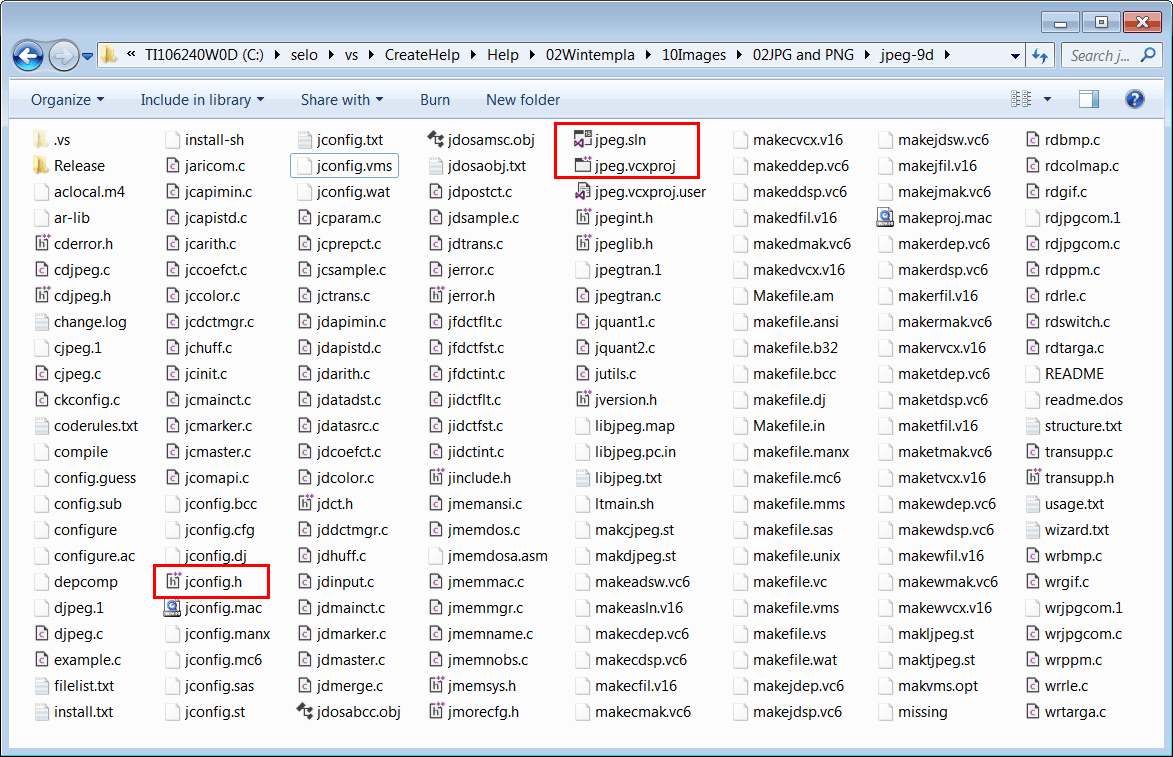
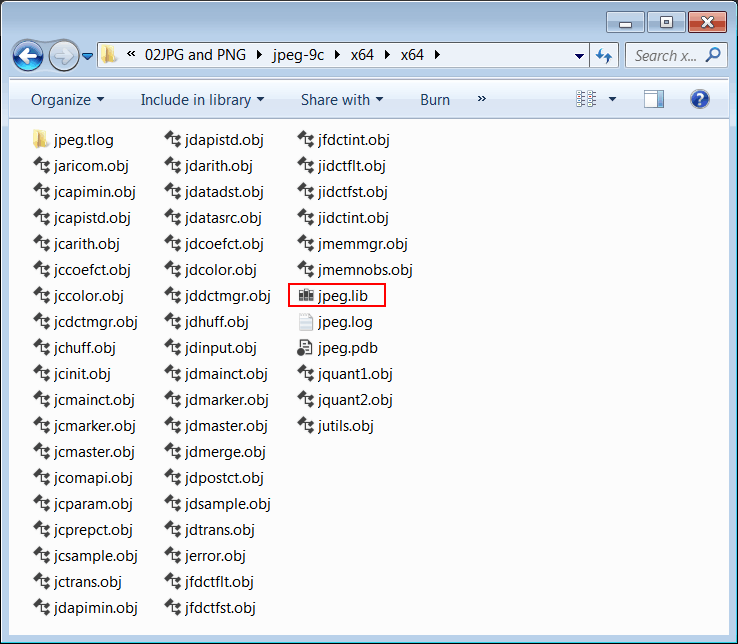
| This group writes and distributes a widely used free library for JPEG image compression, https://www.ijg.org/. There is a Windows format package in zip archive format. After uncompressing the zip file, you will need to rename two Makefiles to Microsoft Visual Studio Solution Files (*.sln). Similarly, you will need to rename five Makefiles to Microsoft Visual Studio Project Files (*.vcxproj). One solution produces jpeg.lib, the other solution produces cjpeg.exe, djpeg.exe and other three more files. This group writes and distributes a widely used free library for JPEG image compression, https://www.ijg.org/. Hay un paquete para Windows en un archivo zip. Después de descomprimir el archivo zip, usted necesitará cambiar de nombre a dos Makefiles a archivos de soluciones de Microsoft Visual Studio (*.sln). De forma similar, usted necesitará cambiar de nombre cinco Makefiles a archivos de proyectos de Microsoft Visual Studio (*.vcxproj). Una de las soluciones produce jpeg.lib. La otra solución produce cjpeg.exe, djpeg.exe y otros tres más archivos. |
cjpeg.exe |
| cjpeg.exe is used to compress bmp or gif files to jpg files. cjpeg.exe -quality 95 picture.bmp picture.jpg cjpeg.exe es usado para comprimir archivos bmp o gif a archivos jpg. |
djpeg.exe |
| djpeg.exe is used to decompress jpg files to bmp or gif. djpeg.exe -gif picture.jpg picture.gif djpeg.exe es usado para descomprimir archivos jpg a bmp o gif. |
| Problem 2 |
| Go to https://www.ijg.org/ and download jpegsr9d.zip. After downloading the zip file, uncompressed the file. Abra https://www.ijg.org/ y descargue jpegsr9d.zip. Después de descarga el archivo zip, descomprima el file. |
| Problem 3 |
| Rename the file makejsln.v16 to jpeg.sln. Rename the file makejvcx.v16 to jpeg.vcxproj. Rename the file jconfig.vc to jconfig.h. Cambie de nombre el archivo makejsln.v16 a jpeg.sln. Cambie de nombre el archivo makejvcx.v16 a jpeg.vcxproj. Cambie de nombre el archivo jconfig.vc a jconfig.h. |
| Problem 4 |
| Open the jpeg.sln solution and try to compile the Release version in 64 bits to generate jpeg.lib. You may need to use your Computer Science skills to get to compile the library. If you are not able to compile the library, follow the next steps. Abra la solución jpeg.sln y trate de compilar la versión Release en 64 bits para generar jpeg.lib. Usted necesitará usar sus habilidades de Ciencias de la Computación para conseguir la compilación de la librería. Si usted no consigue compilar la librería, siga los siguientes pasos. |
| Step A |
| From Solution Explorer, select the jpeg project and right click with the mouse to open the context menu Properties > C/C++ > Optimization > Whole Program Optimization, disable "Whole Program Optimization". Desde el Explorador de Soluciones, seleccione el proyecto jpeg y haga clic con el botón derecho del ratón para abrir el menú de contexto Properties > C/C++ > Optimization > Whole Program Optimization desabilite "Whole Program Optimization". |
| Step B |
| It is very important that the library and the program using the library MUST include the same "Run Time Library". Open the properties of the jpeg project and change the "Run Time Library" Properties > C/C++ > Code Generation > Run Time Library, for the Release version use "Multi-threaded (/MT)", for the Debug version use "Multi-threaded Debug (/MTd)". You must also adjust the "Run Time Library" for both Win32 and x64. Es muy importante que la biblioteca y el programa usando la biblioteca DEBEN incluir la misma "Run Time Library". Abra la propiedades del proyecto jpeg y cambie la "Run Time Library" Properties > C/C++ > Code Generation > Run Time Library, para la versión Release use "Multi-threaded (/MT)", para la versión Debug usa "Multi-threaded Debug (/MTd)". Usted debe también ajustar la "Run Time Library" para ambas Win32 y x64. |
| Problem 5 |
| Create a Wintempla Window Application called ExpertsGroup to display a JPG using jpeg.lib. After creating the project check the Paint event (Window_Paint). Cree una aplicación de Ventana de Wintempla llamada ExpertsGroup para mostrar una JPG usando jpeg.lib. Después de crear el proyecto marque el evento de Paint (Window_Paint). |

| Step A |
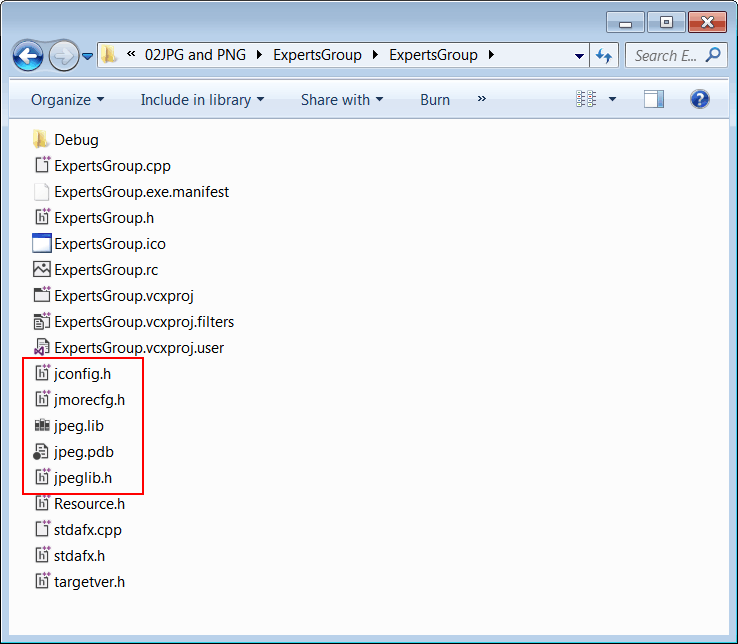
| Open the ExpertsGroup folder of the project (ExpertsGroup\ExpertsGroup\) and copy the files: jpeglib.h, jpeg.lib, jconfig.h, jmorecfg.h and jpeb.pdb. These files are located in different folders of the project compiled in the previous problem. Abra la carpeta del proyecto ExpertsGroup (ExpertsGroup\ExpertsGroup\) y copie los archivos: jpeglib.h, jpeg.lib, jconfig.h, jmorecfg.h y jpeb.pdb. Estos archivos están ubicados en diferentes carpetas del proyecto compilado en el problema previo. |
| Step B |
| Edit the stdafx.h file as shown. Edite el archivo stdafx.h cómo se muestra. |
| stdafx.h |
| . . . //_________________________________________ JPEG #include <stdio.h> #include "jpeglib.h" #pragma comment(lib, "jpeg.lib") //_________________________________________ Wintempla #include "Wintempla.h" #include "WintemplaWin.h" . . . |
| Step C |
| if you get an error about INT32, open the jmorecfg.h file and comment the definition of INT32 as shown below. Si usted obtiene un error acerca de INT32, abra el archivo jmorecfg.h y comente la definición de INT32 cómo se muestra debajo. |
| jmorecfg.h |
| . . . #ifndef XMD_H /* X11/xmd.h correctly defines INT32 */ #ifndef _BASETSD_H_ /* Microsoft defines it in basetsd.h */ #ifndef _BASETSD_H /* MinGW is slightly different */ #ifndef QGLOBAL_H /* Qt defines it in qglobal.h */ //typedef long INT32; #endif #endif #endif #endif . . . |
| Step D |
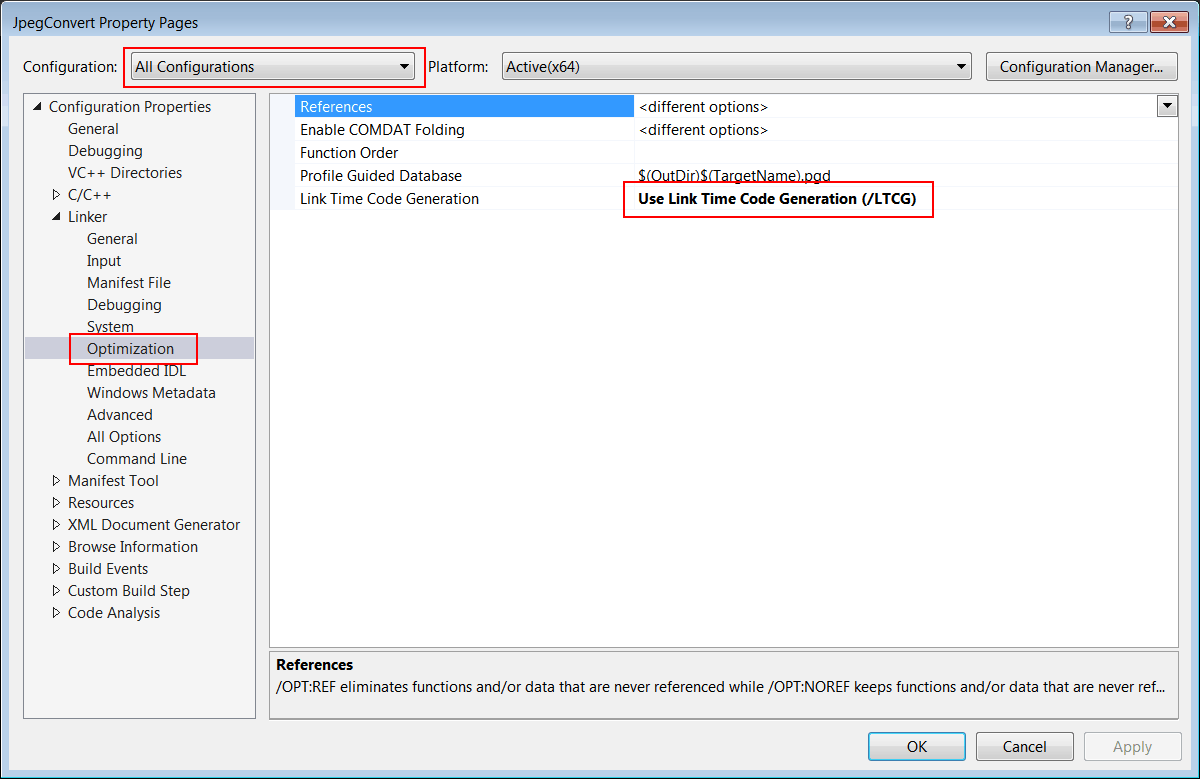
| From Solution Explorer, select the ExpertsGroup project and right click with the mouse to open the context menu, then click on Properties to open the Properties of the project. Select "All Configurations" and change the Linker > Optimization Set Link Time Code Generation to default. Desde el Explorador de Soluciones, seleccione el proyecto ExpertsGroup y haga clic con el botón derecho del ratón para abrir el menú de contexto, entonces haga clic en Propiedades para abrir las propiedades del proyecto. Seleccione "Todas las configuraciones" y cambieLinker > Optimization fije Link Time Code Generation a default. |
| Step E |
| Edit the files ExpertsGroup.h and ExpertsGroup.cpp as shown. Edite los archivos ExpertsGroup.h and ExpertsGroup.cpp cómo se muestra. |
| ExpertsGroup.h |
| #pragma once //______________________________________ ExpertsGroup.h #include "Resource.h" class ExpertsGroup: public Win::Window { public: ExpertsGroup() { } ~ExpertsGroup() { } CG::DIBitmap bitmap; . . . }; |
| ExpertsGroup.cpp |
| . . . void ExpertsGroup::Window_Open(Win::Event& e) { const wchar_t* error = bitmap.Load(L"colorSquares.jpg"); if (error != NULL) this->MessageBox(error, L"ExpertsGroup", MB_OK | MB_ICONERROR); } void ExpertsGroup::Window_Paint(Win::Event& e) { CG::Gdi gdi(hWnd, true, false); RECT rect = { 0, 0, width, height }; gdi.DrawBitmap(bitmap, rect, true); } |
Small PNG Images |
| GDI does not have any support for displaying PNG images. However, a small PNG image can be converted to an ICON image using the Sys::Convert::PngToIcon function. The function supports images of a width and a height less than (or equal to ) 256 pixels. Once the image has been converted, it can be displayed using GDI by calling the gdi.DrawIcon function. GDI no tiene soporte para mostrar imágenes PNG. Sin embargo, una imagen PNG pequeña puede convertirse a una imagen ICON usando la función Sys::Convert::PngToIcon. La función soporta imágenes de un ancho y un alto menor (o igual) a 256 pixeles. Una vez que la imagen se ha convertido, esta puede ser mostrada usando GDI llamando la función gdi.DrawIcon. |
| Tip |
| Wintempla provides JPG encoding, the following example loads an image, and then, it create a JPG file. Wintempla proporciona codificación en JPG, el ejemplo siguiente carga una imagen, y entonces, crea un archivo JPG. |
| EncodeTest.cpp |
| void EncodeTest::Window_Open(Win::Event& e) { //___________________________________________________________ 1. Load image CG::DIBitmap bitmap; const wchar_t* error = bitmap.Load(L"armenia.gif"); if (error != nullptr) { this->MessageBox(error, L"EncodeTest", MB_OK | MB_ICONERROR); return; } //___________________________________________________________ 2. Compress to JPG if (bitmap.SaveJpg(60, L"armenia.jpg") == false) { this->MessageBox(L"Error creating JPG", L"EncodeTest", MB_OK | MB_ICONERROR); } } |